

Per-Listing Overrides
Learn how to customize Buttons & Actions and Permissions behavior for specific In-App Marketplace listings without changing global defaults.
In-App Marketplace setup
What this tab does
By default, every listing in your In-App Marketplace inherits the configuration you set on Buttons & Actions and Permissions. The Per-Listing Overrides tab lets you customize specific listings that need different behavior, without affecting the rest of your catalog.
Common reasons to use overrides:
- A specific integration has a multi-step approval flow that doesn't match your default status mapping.
- A specific integration requires a particular tier even though most integrations are open.
- A specific integration uses a different OAuth URL or in-app destination than the default.
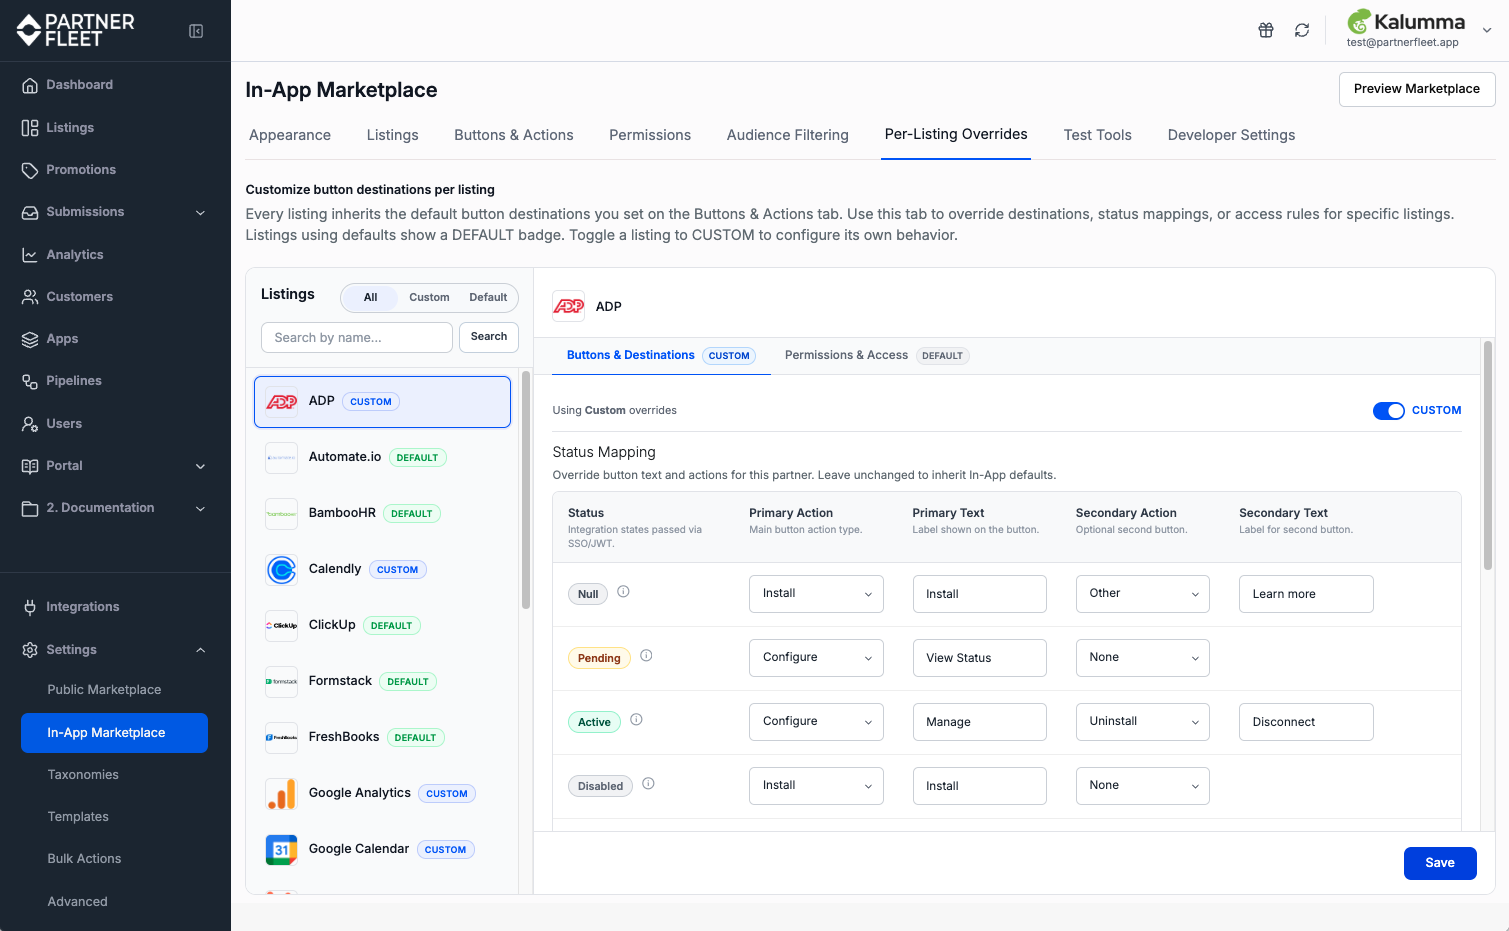
How the page is organized
The page has two main sections:
- Listings panel (left) — every listing in your In-App Marketplace, with badges showing whether each uses defaults (DEFAULT) or custom overrides (CUSTOM). Search and filter controls at the top let you find a listing quickly. Toggle between All, Custom, and Default views to scope the list.
- Configuration panel (right) — when you select a listing, this panel shows its current configuration. Two sub-tabs organize the override controls.
The two override sub-tabs
When you select a listing, the configuration panel shows two sub-tabs:
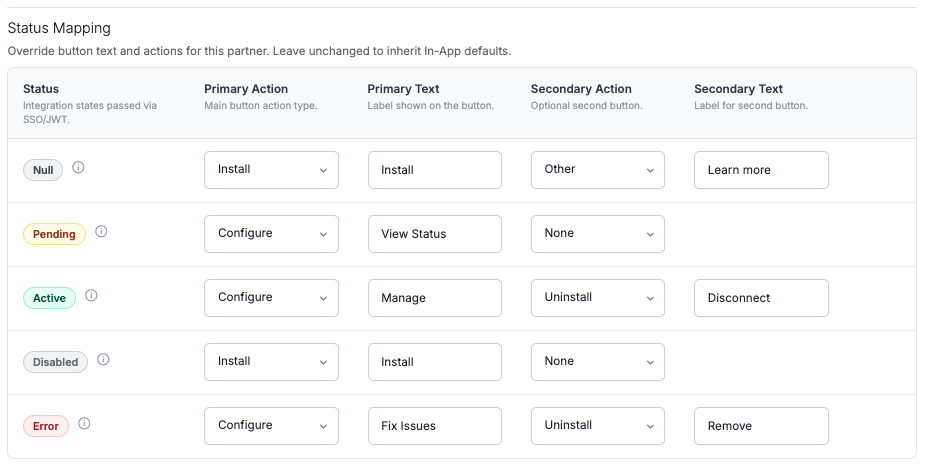
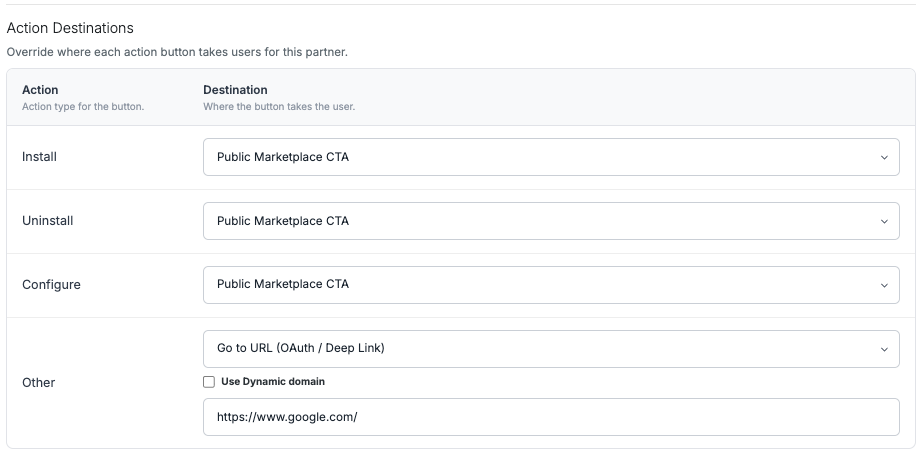
- Buttons & Destinations — overrides for status mapping and action destinations. Mirrors the structure of the main Buttons & Actions tab.
- Permissions & Access — overrides for who can install and what restricted users see. Mirrors the structure of the main Permissions tab.
Each sub-tab has its own DEFAULT/CUSTOM badge, so you can see at a glance which areas of a listing are inheriting defaults and which have overrides.
Working with the DEFAULT/CUSTOM toggle
By default, when you select a listing, both sub-tabs show DEFAULT — meaning the listing inherits your global settings. You can see the fields in each sub-tab, but you can't edit them until you switch to CUSTOM.
To override:
- Click the toggle in the top-right of the sub-tab to switch from DEFAULT to CUSTOM.
- The fields become editable. Make your changes.
- Click Save Changes.
To revert to defaults, switch the toggle back to DEFAULT. Partner Fleet clears the custom values, and the listing inherits the global settings again.
Buttons & Destinations sub-tab
This sub-tab combines two things into one view:
- Status Mapping — override which actions appear for each status on this specific listing. Uses the same five default statuses, plus any custom Pending statuses, as the main Buttons & Actions tab. Edit Primary Action, Primary Text, Secondary Action, and Secondary Text.
- Action Destinations — override the destination for the Install, Uninstall, Configure, and Other action types on this listing. Same destination options as the main Buttons & Actions tab: Public Marketplace CTA, Open lead form, Show message, Go to URL, and Send to page in my app.
Status Mapping appears first, Destinations second — matching the order of the main Buttons & Actions tab so the layout feels consistent.
Permissions & Access sub-tab
This sub-tab also combines two things:
- Permissions — override the access rules for this specific listing. Account-level and user-level permission cards work the same way as the main Permissions tab, with Can install toggles per option.
- No Access Fallback — override what restricted users see when they try to install this specific listing. Same fallback options as the main Permissions tab: Show message, Go to URL, Send to page in my app, Open lead form, and Public Marketplace CTA.
Permissions appear first, No Access Fallback second.
Common override scenarios
Salesforce with admin approval
Most of your integrations use a simple OAuth flow, but Salesforce requires a Salesforce admin to approve the connection. Override the Salesforce listing's Status Mapping to use a custom Pending status, such as "Awaiting Salesforce Admin Approval," with a "View Status" button. Override the Configure action destination to a Send to page in my app destination that opens your in-product mapping configuration.
Premium integration restricted to Enterprise
Most of your integrations support all tiers, but one premium integration is Enterprise-only. Override that listing's Permissions to set Enterprise = ON, Standard and Free = OFF. Override the No Access Fallback message to mention the upgrade path specifically for that integration.
Custom OAuth URL for a specific partner
Most of your Install destinations route through an OAuth URL with a standard pattern, but one partner uses a non-standard authorization endpoint. Override that listing's Install destination to use the partner's specific Go to URL.
Partner-specific Learn more link
Your global Other destination points to a generic partner directory page, but one premium partner has a dedicated marketing landing page with case studies and demo videos. Override that listing's Other destination to use the partner's specific landing page URL instead.
Search, filter, and listing list management
With many listings, finding the one you want to override matters:
- Search by name to find a specific listing.
- Use the All / Custom / Default toggle to scope the listing list.
- The CUSTOM badge appears next to any listing that has at least one override in either sub-tab.
Select a listing in the list to load its configuration in the right panel. Selecting a different listing clears the right panel and loads the new listing — make sure to save changes before switching.
When to use overrides vs. defaults
Use overrides sparingly: Per-listing overrides are powerful but add maintenance overhead. Every override is a configuration that someone has to remember and update if your global setup changes. Use overrides for legitimate exceptions, but try to handle the common cases via your global Buttons & Actions and Permissions defaults. If you find yourself overriding the same thing on many listings, consider whether your defaults should change instead.
Updated 4 months ago