

Developer Settings
Learn how to configure allowed domains, CNAME validation, JWT SSO, the embed script, and error redirects for the In-App Marketplace.
In-App Marketplace setup
What this tab does
Developer Settings is where you configure the technical pieces that connect your application to the In-App Marketplace: which domains can embed it, what subdomain serves it, the JWT shared secret, the embed script, and where users go when they hit errors.
Your engineering team typically configures this tab or works closely with your admin team on it. The Setup Checklist on the right side of the page tracks progress through each section.
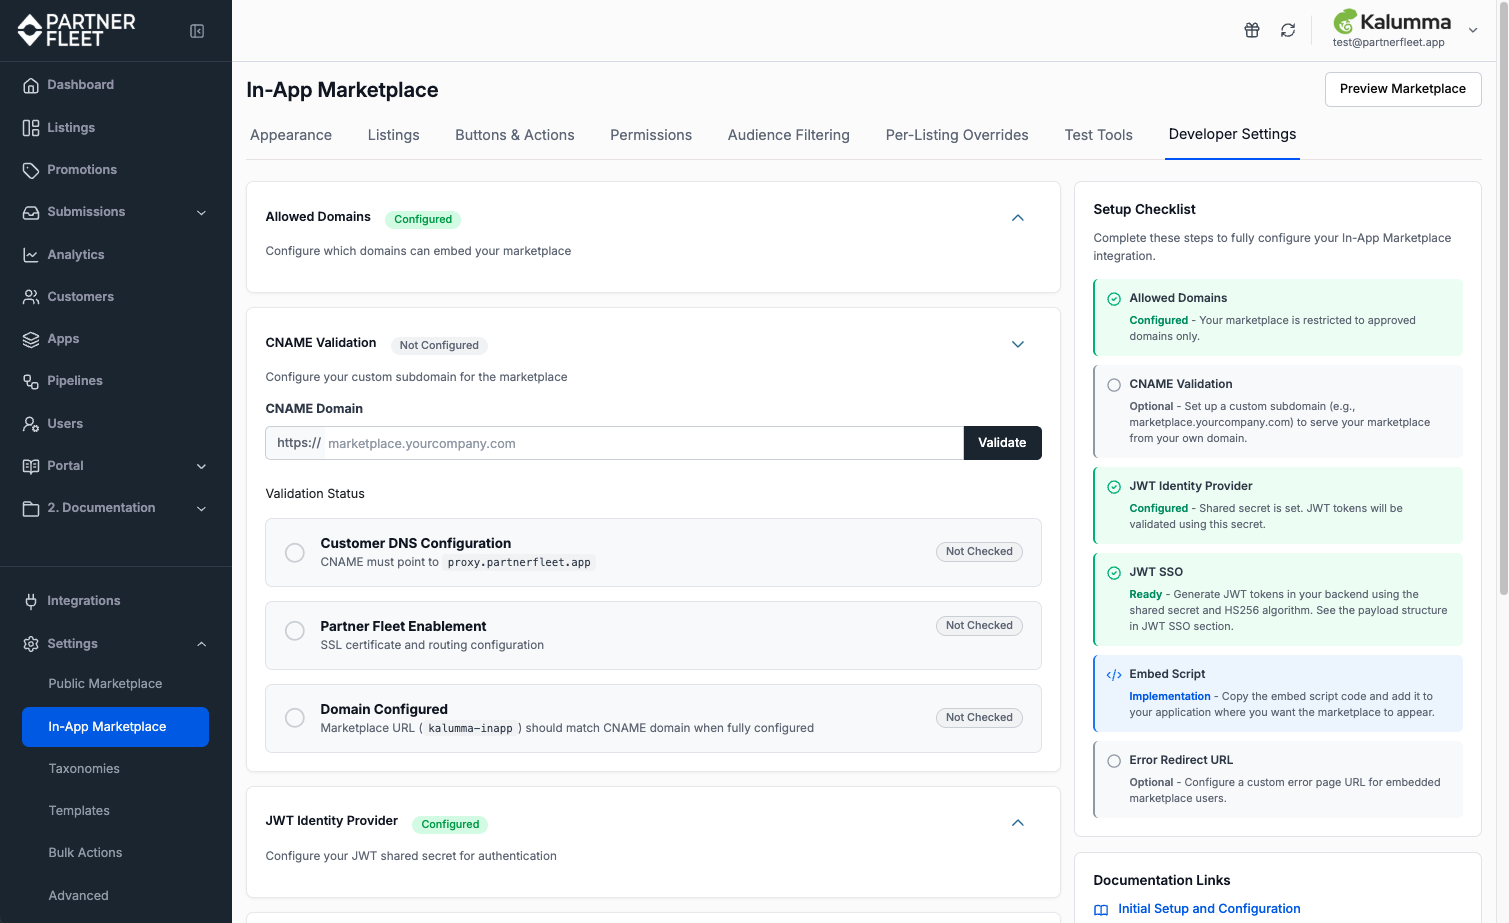
Setup Checklist
The right sidebar shows the configuration steps in order, with status badges:
- Configured (green) — done.
- Ready (green) — ready to use.
- Implementation (gray) — pending action.
- Optional (gray) — not required for launch but recommended.
Use the checklist as your roadmap. Work top to bottom; complete each section before moving to the next.
Allowed Domains
Allowed Domains is a security control: the embedded marketplace will only render on domains you've explicitly authorized. This prevents unauthorized sites from embedding your marketplace.
Adding domains
Enter the full URL of any domain that should be allowed to embed the marketplace, then click Add Domain. You can use wildcards, such as *.yourcompany.com, to allow any subdomain. Common entries:
- Your production domain, such as
https://app.yourcompany.com. - Your staging or QA domains.
- Local development environments. Use these sparingly and remove them before launch.
Each domain shows a Valid badge after Partner Fleet verifies it. Remove domains by clicking the trash icon.
Embedded message delivery
Choose how Partner Fleet routes postMessage events:
- Only my listed domains (Recommended) — Partner Fleet sends
postMessageevents only to the domains in your Allowed Domains list. This is the safe default for most setups. - Any embedding site — Partner Fleet sends
postMessageevents to whichever site embeds the marketplace. Use this only when your Allowed Domains list contains wildcards and you need looser routing.
CNAME Validation
Optional but recommended. Configure a custom subdomain, such as marketplace.yourcompany.com, so the marketplace appears first-party to your end users instead of using a Partner Fleet domain.
Validation steps
Three checks confirm your CNAME works correctly:
- Customer DNS Configuration — your CNAME record must point to
proxy.partnerfleet.app. - Partner Fleet Enablement — Partner Fleet provisions the SSL certificate and routes traffic.
- Domain Configured — the marketplace URL matches the CNAME domain.
Enter your CNAME domain in the input field and click Validate. The status of each check updates as Partner Fleet verifies the configuration.
CNAME setup involves DNS:
Adding a CNAME record requires access to your DNS provider. If you don't manage DNS yourself, coordinate with your IT or infrastructure team. SSL provisioning typically completes within minutes once the DNS record is in place.
JWT Identity Provider
Configure the shared secret for JWT token signing. Your application uses this key to sign tokens, and Partner Fleet uses it to verify them.
Provider Name
An internal label for this identity provider configuration, such as "embedded."
Shared Secret
A secret string signs JWT tokens. Click the eye icon to reveal it. Click Update Secret to rotate it.
Treat the shared secret like a password:
Store the shared secret as an environment variable or in your secrets manager. Never commit it to source code or share it via insecure channels. Rotating the secret invalidates all tokens signed with the old secret, so coordinate any rotation with your engineering team.
JWT SSO
Documents the expected JWT payload structure your application must generate. The page shows the exact JSON structure expected, including required and optional fields.
Required user fields
Every JWT must include these claims at the top level:
email(string) — unique identifier for the user.ufn(string) — user's first name.uln(string) — user's last name.
Optional user custom fields
Pass user-level custom fields in the fields object. Common examples:
user_type— the user's role or type, which you map to your user-level permissions.
Required account information
Pass account context in the account object:
external_id(string) — unique identifier for the account.name(string) — account display name.
Optional account custom fields
Account-level custom fields go inside the account object alongside the required ones. Common examples:
tier— pricing tier, which you map to your account-level permissions.region— supports audience filtering.beta— flag for beta program participation.
Required JWT expiration
Every token must include an exp claim — a Unix timestamp indicating when the token expires. Set expiration to more than 5 minutes from generation time. Partner Fleet automatically refreshes tokens within 5 minutes of expiration.
Technical requirements
- Algorithm: HS256 (HMAC SHA-256).
- Token Expiration: more than 5 minutes from generation time.
- Token Refresh: Partner Fleet requests a new token if the current token is within 5 minutes of expiration.
For Ruby, Node.js, and Python implementation examples, see the JWT SSO Implementation Guide.
Embed Script
The HTML/JavaScript snippet your engineering team adds to your application to render the marketplace. The page generates the snippet automatically using your specific subdomain and trusted origins. Click Copy to copy the snippet.
The snippet has three pieces:
- A container
divwhere the marketplace will render. - A
scripttag that loads the Partner Fleet embed loader. - An initialization block that creates an
EmbeddedIframeinstance withiframeOrigin,trustedOrigins, andcontainerIdparameters.
For full implementation guidance, including how to wire up the JWT callback and handle postMessage events, see the Embed Script Implementation Guide.
Error Redirect URL
Optional. Configure a custom error page URL where Partner Fleet redirects users if they encounter errors (404, 500, etc.) inside the embedded marketplace.
Configuring the redirect URL
Enter an HTTPS URL where Partner Fleet should redirect users on error. The URL domain must match one of your configured Allowed Domains — Partner Fleet will not redirect to arbitrary external URLs.
If you don't configure a redirect URL, users see Partner Fleet's default error page within the embedded marketplace.
Why use a custom error page:
A custom error redirect lets you maintain your product's branding and offer your own next steps, such as "contact support" or "return to dashboard," instead of dropping users on a generic error screen. For most production deployments, this is worth the few minutes it takes to configure.
Updated 4 months ago