Buttons & Actions
Learn how to map integration statuses to buttons and configure default button destinations for the In-App Marketplace.
In-App Marketplace setup
What this tab does
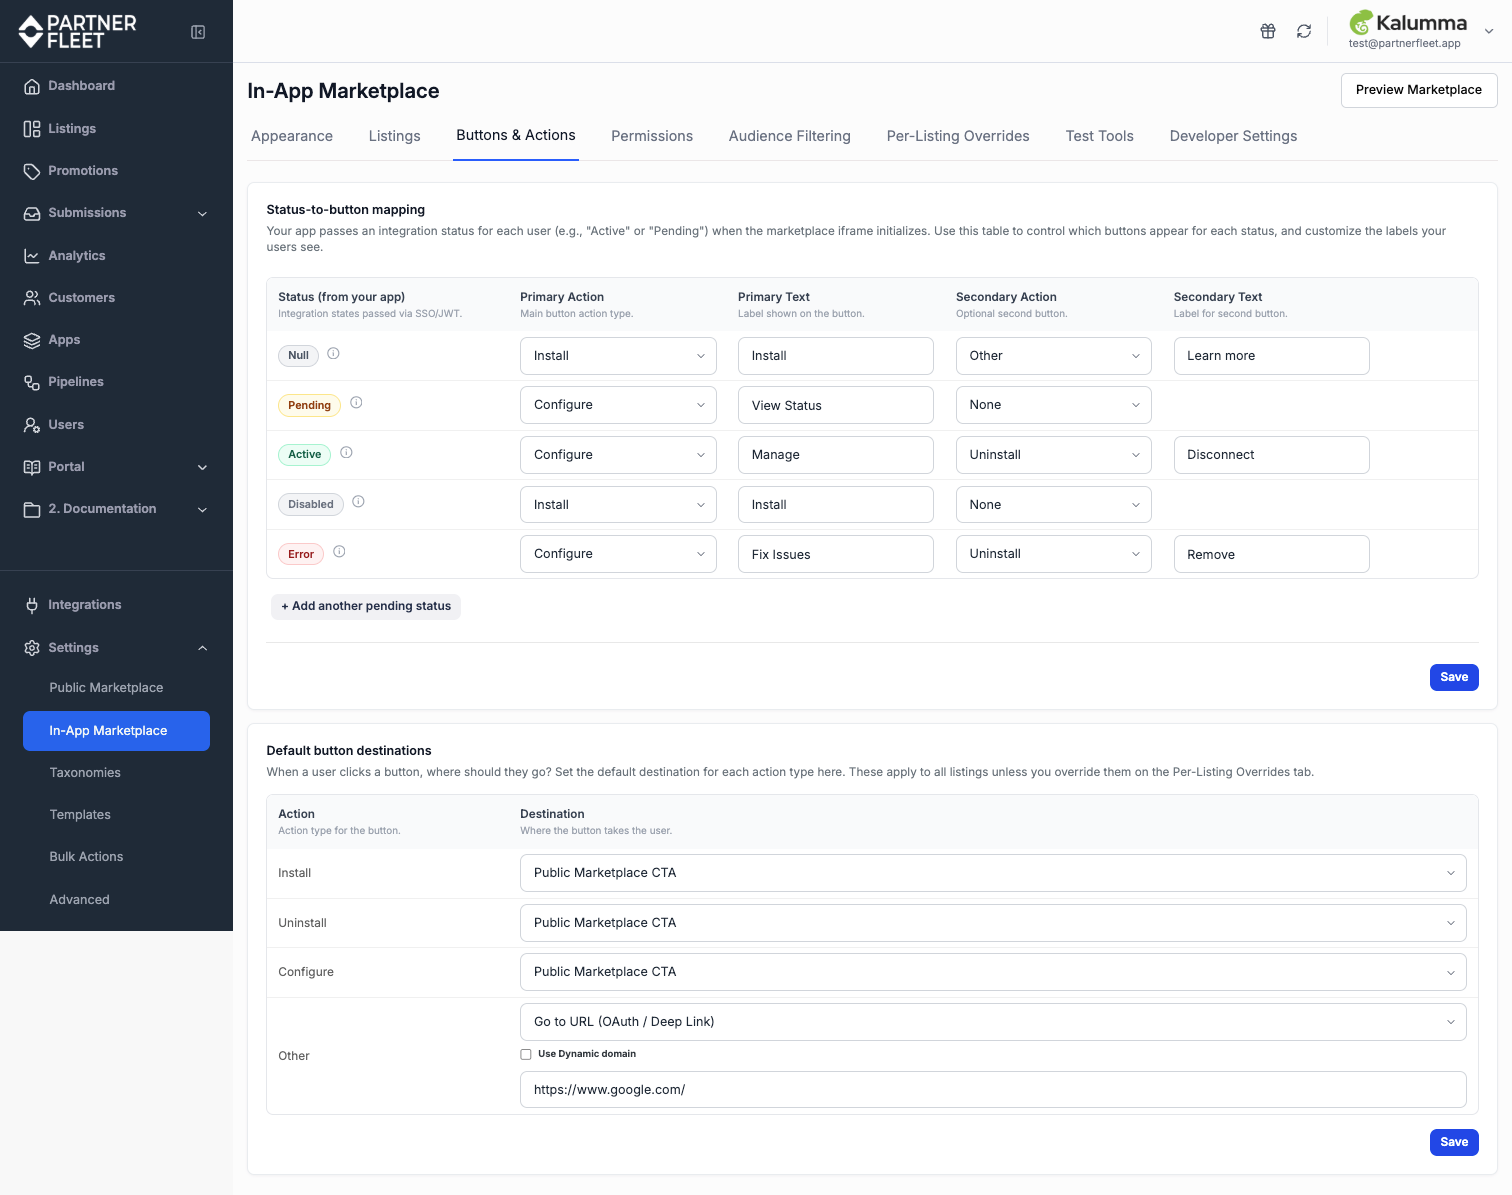
Buttons & Actions controls which buttons appear on each listing based on the user's current integration status, and where those buttons take users when clicked. This is how you make the marketplace feel personalized: a user who's already installed an integration sees "Manage," a user who has never touched it sees "Install," and a user with an error sees "Fix Issues."
How it works
Your application passes an integration status for each user through the embed script when the marketplace iframe initializes. The Buttons & Actions tab maps those statuses to action buttons. There are two parts to the configuration:
Note for engineering: Integration status is passed via the embed script's
integrationsarray, not the JWT. See the Embed Script Implementation Guide for the data structure.
- Status-to-button mapping — for each status (Null, Active, Pending, Disabled, Error, plus any custom statuses you add) choose which buttons appear and what they say.
- Default button destinations — for each action type (Install, Uninstall, Configure, Other) choose what happens when a user clicks the corresponding button.
Statuses
Five default statuses come pre-configured. They cannot be edited or removed:
| Status | Meaning |
|---|---|
| Null | No status passed for this integration. The user has not interacted with it. The default state for new users. |
| Active | The integration is currently installed and active for this user/account. |
| Pending | The integration is awaiting approval, activation, or a follow-up step. |
| Disabled | The integration was previously active but has been disabled. |
| Error | The integration has an error and requires attention. |
Custom statuses
If your workflow needs more granularity, you can add additional Pending-type statuses. Common examples:
- Awaiting Approval — distinguished from a generic Pending status to give users a clearer message.
- Mapping Required — a Pending state where the user needs to complete field mapping before the integration is fully active.
Click + Add another pending status at the bottom of the table to create a custom status. Custom statuses behave like Pending in reporting and metrics, but you can give them their own primary action and label.
Configuring each status row
Each row in the status mapping table has four configurable fields:
- Primary Action — the main action type for the primary button. Options are Install, Uninstall, Configure, Other, or None. Choose the action that matches what the user should do next from this status.
- Primary Text — the label shown on the primary button. Edit this to match your product's language. For example, change "Install" to "Connect" or "Manage" to "Settings."
- Secondary Action — an optional second action type. If set to anything other than None, a second button appears next to the primary button. Use this to give users two paths from the same status, such as "Manage" + "Disconnect" for an Active integration.
- Secondary Text — the label on the secondary button. Only visible when a Secondary Action is set.
Default mapping:
When you first arrive at the Buttons & Actions tab, the table is pre-populated with sensible defaults: Null shows "Install," Active shows "Manage" + "Disconnect," Pending shows "View Status," Disabled shows "Reinstall," and Error shows "Fix Issues" + "Remove." Most teams customize the labels but keep the structure.
Default button destinations
When a user clicks an action button, where should they go? The Default button destinations section answers this for each action type.
There are four action types — Install, Uninstall, Configure, and Other — and five possible destinations:
| Destination | What happens |
|---|---|
| Public Marketplace CTA | Uses the CTA already configured on the listing's public marketplace page. This is the default — it ensures listings work immediately without additional setup. |
| Open lead form | Displays a Partner Fleet-generated lead capture form as a modal. Useful for partner inquiries. |
| Show message | Displays a customizable dialog with text you define. Useful for instructions, contact info, or simple status updates. |
| Go to URL (OAuth / Deep Link) | Redirects the user to a specified URL. Used for OAuth authorization flows, deep links into partner apps, or any external destination. |
| Send to page in my app | Uses JavaScript to navigate the user to a location within your own application. Enables fully custom in-app workflows. |
Use Dynamic Domain (for Go to URL)
When using Go to URL with a multi-tenant partner application where each end-user account has its own subdomain, you can use the Use Dynamic domain checkbox to substitute the user's account-specific domain at runtime. See the Dynamic Domains documentation for details on syntax and configuration.
When to use Other
The Install, Uninstall, and Configure action types cover the common verbs for managing an integration's lifecycle. Other is a fourth, generic action type for buttons that don’t fit those verbs — typically buttons that link to content outside your application.
Common use cases:
- Learn more buttons. Link to a marketing page that describes the integration in more detail before the end user commits to installing.
- Documentation links. Send the end user to the partner’s setup documentation, API docs, or knowledge base.
- Demo or walkthrough videos. Open a video walkthrough hosted on YouTube, Vimeo, or your own help site.
- Contact partner / request a demo. Open a lead form for partner-driven sales motions, or link to a Calendly-style scheduling page.
- Pricing pages or comparison tools. Send the end user to a partner-hosted page that lets them evaluate options before deciding.
Teams most often use Other as a secondary action paired with a primary integration verb. For example, a Null status might show "Install" (primary, action type Install) plus "Learn more" (secondary, action type Other linking to a marketing page). You can also use Other as a primary action when none of the integration verbs apply — for example, a listing that’s purely informational with no installable component.
How status, button, and destination connect
Putting the two parts together:
- A user with status Null sees the primary button you configured for Null, such as "Install."
- When they click that button, the destination configured for the Install action type kicks in.
- If you set the Install destination to Go to URL with an OAuth URL, that user clicks "Install" and gets redirected to the OAuth flow.
This separation gives you flexibility: you can change button labels and behavior independently from where buttons go.
Per-listing overrides
The Buttons & Actions tab sets defaults that apply to every listing in your In-App Marketplace. If a specific listing needs different behavior, such as different status mapping or different destinations, use the Per-Listing Overrides tab to override the defaults for that one listing without affecting others.
Updated 4 months ago