Permissions
Learn how to configure account-level and user-level install permissions for the In-App Marketplace, including No Access Fallback behavior.
In-App Marketplace setup
What this tab does
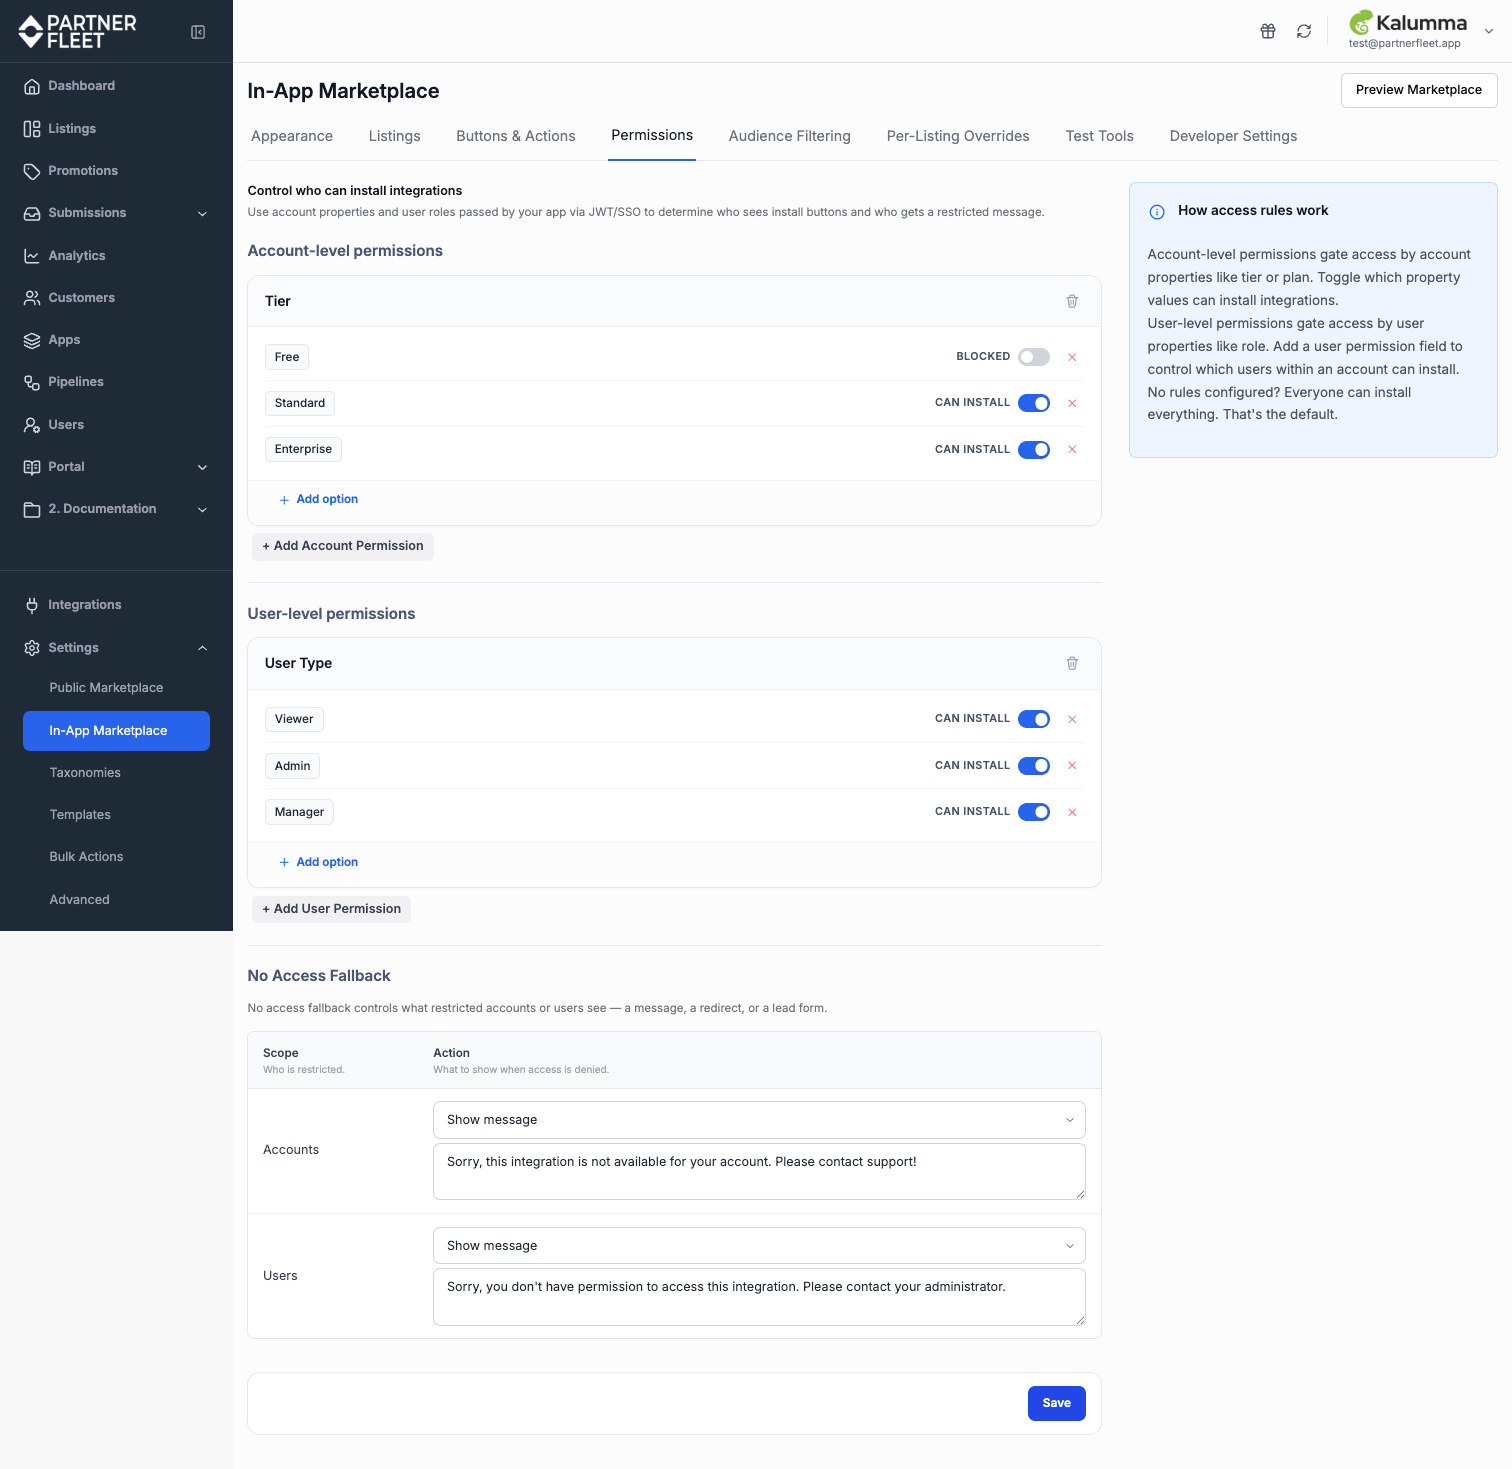
Permissions controls who can install integrations in your In-App Marketplace. You can gate access by account property, such as only Enterprise-tier accounts, and by user property, such as only admin-role users. When restricted users click an action button, instead of proceeding to the normal destination, they're routed to a fallback that you configure — typically a message explaining why.
Permissions vs. Audience Filtering
It's worth understanding how Permissions differs from Audience Filtering, because they sound similar:
- Audience Filtering hides listings entirely from users whose accounts don't match. Filtered listings don't appear in the marketplace at all.
- Permissions shows the listing to everyone — but when restricted users click a button, they get a fallback response instead of the normal destination.
Use Audience Filtering when a listing isn't relevant to an audience. Use Permissions when a listing is relevant but you want to gate access, such as "upgrade your plan to access this."
How access checks work at runtime
Permissions are checked at click time, not at render time:
- The marketplace renders. Every user sees the same buttons for a given status.
- A user clicks an action button.
- Partner Fleet checks the access rules using the account and user properties from the JWT.
- If the user has access, they proceed to the configured destination. If not, they're routed to the No Access Fallback for the appropriate scope: account or user.
This means restricted users see a normal-looking marketplace until they take action — at which point they get a clear explanation of why they're restricted.
Account-level permissions
Account-level permissions gate access by account properties. The most common example is gating by tier: only Enterprise accounts can install certain integrations.
Each account-level permission is shown as a card with the field name, such as "Tier" or "Pricing Tier," and a list of options, such as "Free," "Standard," and "Enterprise." Each option has a Can install toggle:
- Toggle ON: accounts whose property matches this option can install integrations.
- Toggle OFF: accounts whose property matches this option cannot install. They're routed to the No Access Fallback.
Default permissions
New accounts come pre-configured with two defaults to make the page immediately usable:
- Account-level: "Tier" with options Free, Standard, and Enterprise. All toggles default to ON.
- User-level: "Role" with options Viewer, Manager, and Admin. All toggles default to ON.
With all toggles ON, the defaults exist as scaffolding but don't gate anything. Toggle off any option to start gating access.
User-level permissions
User-level permissions gate access by user properties. The most common example is gating by role: only admin-role users can install integrations, while standard users see a "contact your administrator" message.
User-level permissions work the same way as account-level permissions: cards with field names and options with Can install toggles. They are evaluated in addition to account-level permissions:
- Both must pass. For a user to install an integration, both their account property and their user property must allow it. If either is restricted, the user is routed to the corresponding No Access Fallback.
Adding, editing, and removing permissions
All permission management happens inline on the page — no separate dialogs:
- Click the pencil icon next to a field name or option to edit it inline.
- Click + Add Option to add a new option to an existing permission.
- Click the red X next to an option to remove it.
- Click the trash icon in a card header to remove the entire permission.
- Click + Add Account Permission or + Add User Permission to add a new permission card.
Coordinating with your engineering team:
Permission field names and option values must match what your application passes in the JWT. If your app sends
tier: "enterprise"but you've named the option "Enterprise," the casing mismatch will prevent the rule from matching. Coordinate exact strings with engineering.
No Access Fallback
When a restricted account or user clicks a button, the No Access Fallback determines what happens next. You configure separate fallbacks for the account scope and the user scope:
| Action | What it does |
|---|---|
| Show message | Displays a customizable message in a modal. Default for both Accounts and Users. |
| Go to URL | Redirects the user to a specified URL, such as your upgrade page. |
| Send to page in my app | Uses JavaScript to navigate the user to a location within your own application. |
| Open lead form | Displays a Partner Fleet-generated lead capture form. |
| Public Marketplace CTA | Falls back to the CTA configured on the public marketplace listing. |
Default messages are pre-populated to give you a sensible starting point:
- Accounts default: "Sorry, this integration is not available for your account. Please contact support."
- Users default: "Sorry, you don't have permission to access this integration. Please contact your administrator."
Edit these to match your product's language and link to your specific upgrade or support flows.
Common patterns
Tier-gating premium integrations
Configure account-level Tier permission with toggles ON for Standard and Enterprise, OFF for Free. Set the Accounts No Access Fallback to a message linking to your upgrade page.
Admin-only installs
Configure user-level Role permission with toggle ON for Admin, OFF for Manager and Viewer. Set the Users No Access Fallback to a message instructing standard users to contact their admin.
Open access
Leave all toggles ON, which is the default state. All accounts and users can install all integrations. This is the default behavior — no configuration is needed for an open-access marketplace.
Updated 4 months ago